Please use the API key for authentication. If you do not have one, then log in as an admin and navigate to account settings to create one. You need to add this API key as a header to each call/request. If it is missing, you will get an error message.
Remember that this key is an identifier of your account, so please keep it safe and do not share it with anyone except your organization.
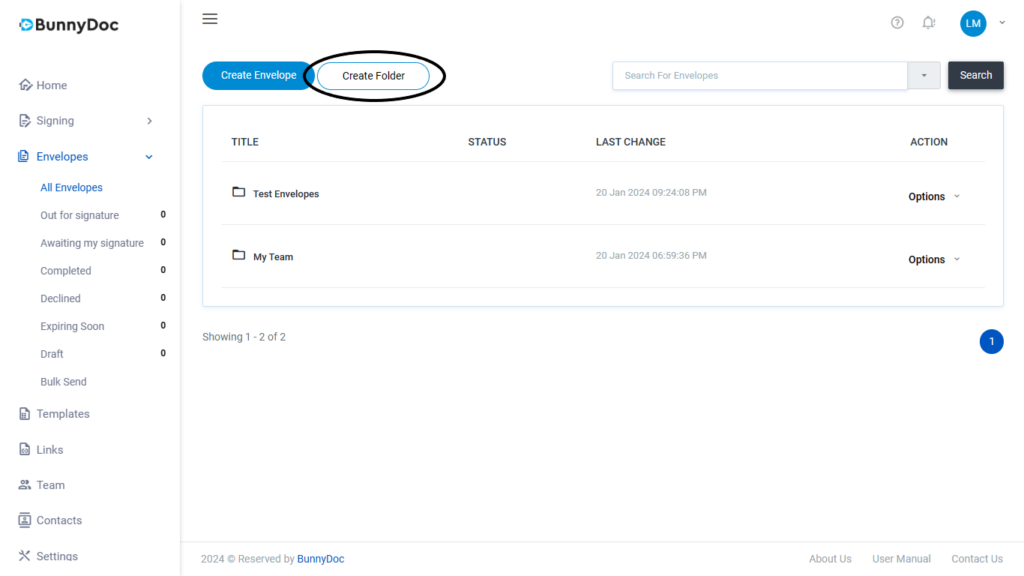
Click on ‘All Envelopes’ under the Envelope from the left sidebar.
Click on the ‘Create Folder’ button from the drop down menu.
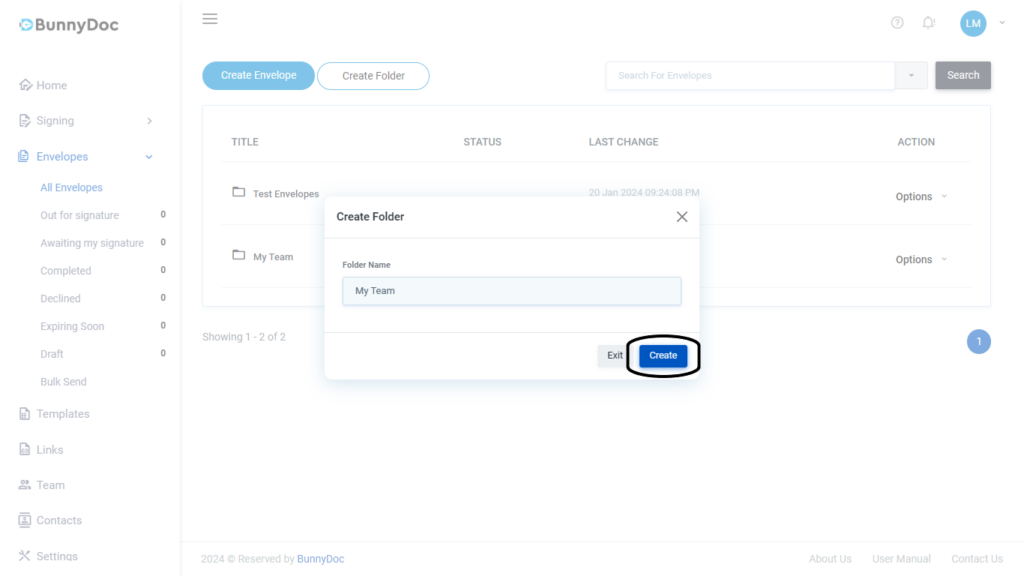
4. Give a name to the folder and then click on the ‘Create’ button.
5. Click on ‘Options’.
6. Select ‘Share with team’ from the drop down menu.
7. Select the team member(s).
8. Click on ‘Update’ button.
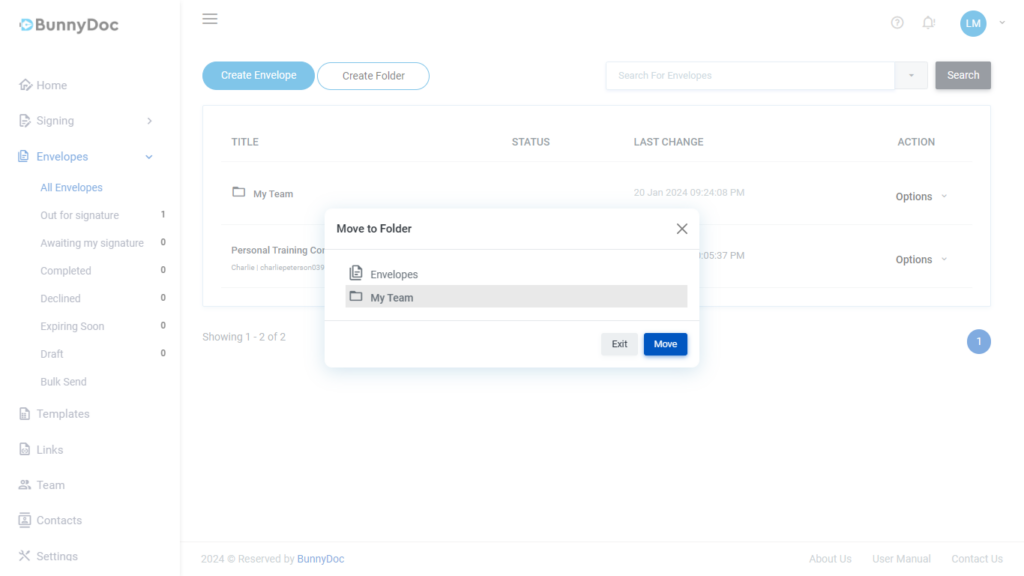
9. Go to the Envelope and click ‘Options’.
10. Click on ‘Move to the Folder’ from the drop down menu.
11. Select the folder and click on ‘Move’ button.
Please initiate the process again by clicking the link you recieved in your email.
In case you do not click "Finish" within the allowed time, this error will occur. Follow these steps to resolve it:
1. Go back to your email inbox.
2. Locate the email containing the signature request.
3. Open the email and click on the “Review & Sign” link provided.
This action will reopen the document, allowing you to resume the signing process.
4. Follow the instructions to review the document.
5. Sign the document as required.
6. Click the “Finish” button to complete the process.
7. Click on “I Agree” to acknowledge that these signatures are legally bound to this document and the e-Signature Terms & Conditions.
The document has been successfully signed and sent back to the sender. You may also download a copy of this document for your records.
How to Share a Completed Envelope with New Viewers?
Go to the envelopes from the leftbar.
Click on Options next to the completed envelope.
Click on “Share Files”.
Enter the recipient’s email and click the “Share Envelope Files” button.
How to do an in person signing?
1: Go to the envelopes from the left sidebar.
2: Click on ‘Options’ next to the envelope, then select ‘Audit Trail’ from the drop-down menu.
3: In the Audit Trail, navigate to the recipients section and click on the “Sign Now” button.
4: Now the signer page will open.
5: Continue to sign the document.
How to make the Date Field Dynamic?
Go to the templates and create or edit a template.
In the editor page, drag and drop the Date field, then click on ‘Advanced Settings’ from the right sidebar.
3. Now enable the “Update value upon envelope creation”.
4. Click on “Save” button to save the changes.
Note: If you have added a date for “Me(Now)” role, it will remain as it was; otherwise, it will be updated if you enable the 'Update Value Upon Envelope Creation' option. And if the date is for the signer, such as the signed date, it will be updated automatically when the signer signs the document.
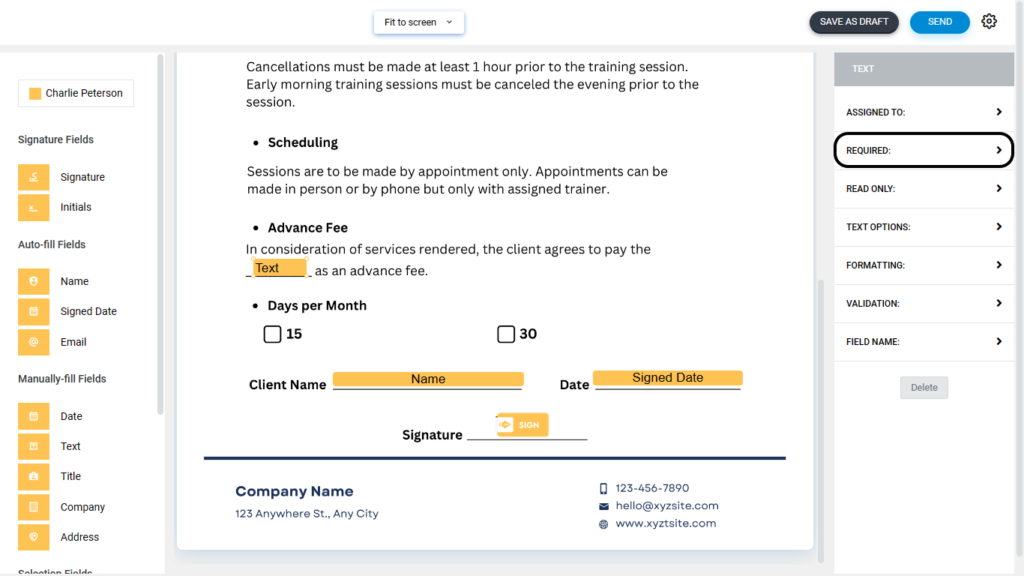
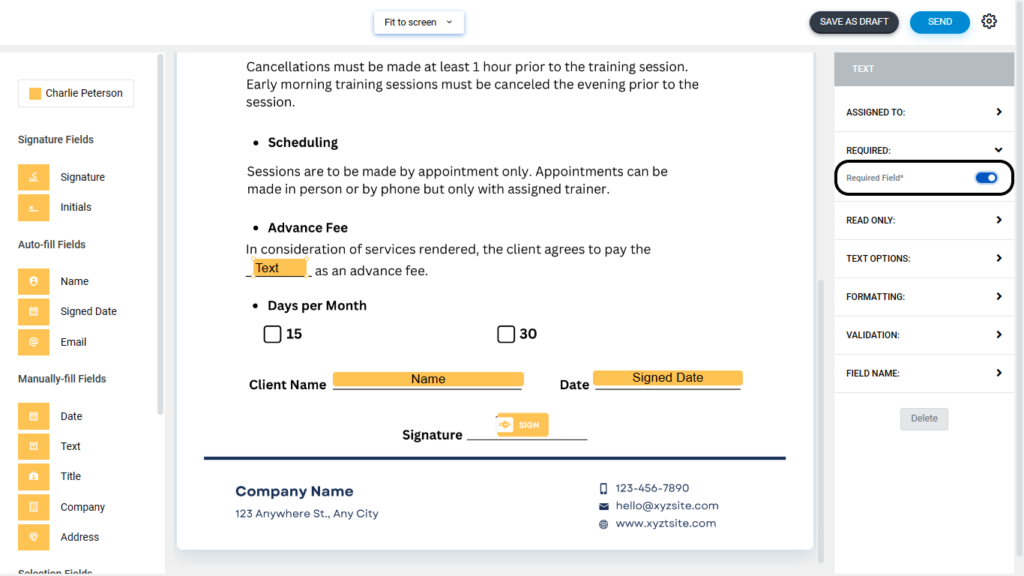
How to make Fields Required?
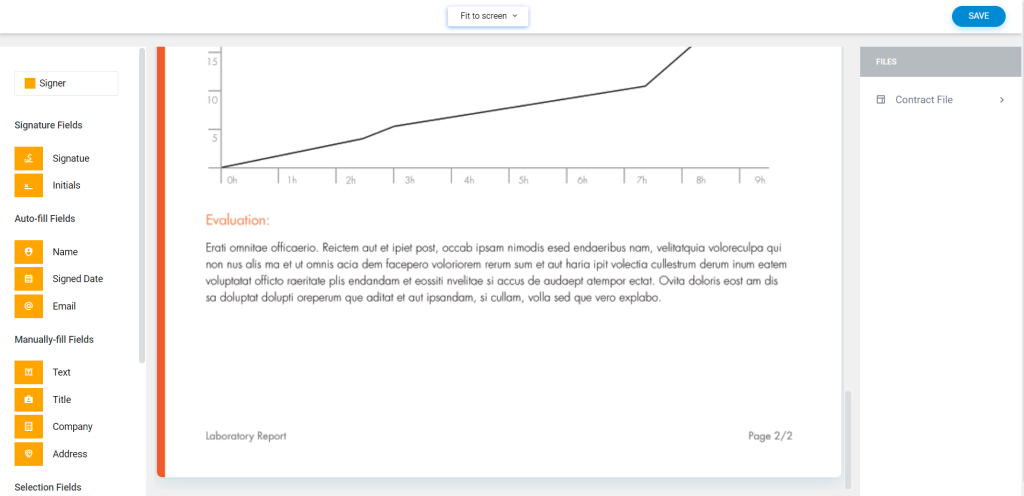
In the editor, Drag and drop the required field.
Click on the “Required” from the right sidebar.
3. Now enable the Required Field.
Note: Keep in mind that Signature fields are required by default, and fields such as Name, Signed Date, and Email will auto-populate. Therefore, there's no need to mark these fields as required.
A template refers to a predefined document or form that is designed to be filled out and signed electronically. It serves as a framework or blueprint for creating consistent and standardized documents that require signatures. Templates are commonly used in various industries for documents such as contracts, agreements, and consent forms.
By using templates, businesses can save time and effort by eliminating the need to recreate documents from scratch for each instance. Templates can be easily customized, updated, and reused for multiple transactions or agreements. This streamlined approach helps maintain consistency, improves efficiency, and ensures compliance with legal and regulatory requirements.
4. Give a name to the folder and then click on the ‘Create’ button.
5. Click on ‘Options’
6. Select ‘Share with team’ from drop down menu.
7. Select the team member(s).
8. Click on ‘Update’
9. Go to the Template and click ‘Options’
10. Click on ‘Move to Folder’ from the drop down menu.
11. Select the folder and click on ‘Move’.
Note:The admin and the owner of this folder will always have access to this folder. Additionally, you can grant access to other team members for this folder.
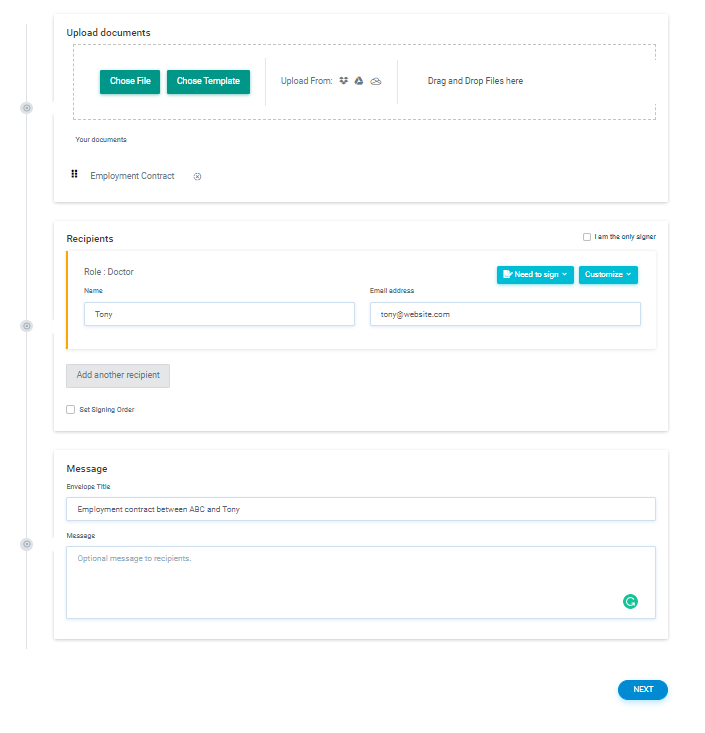
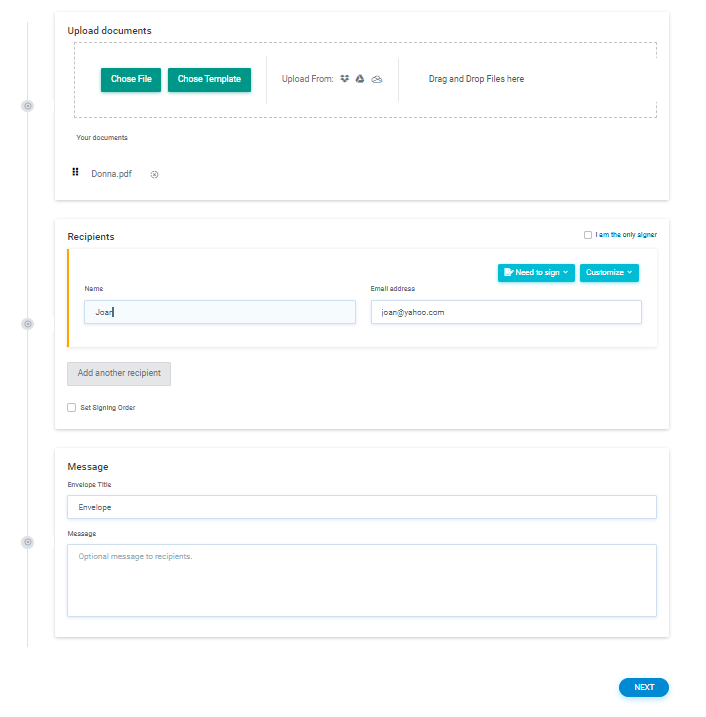
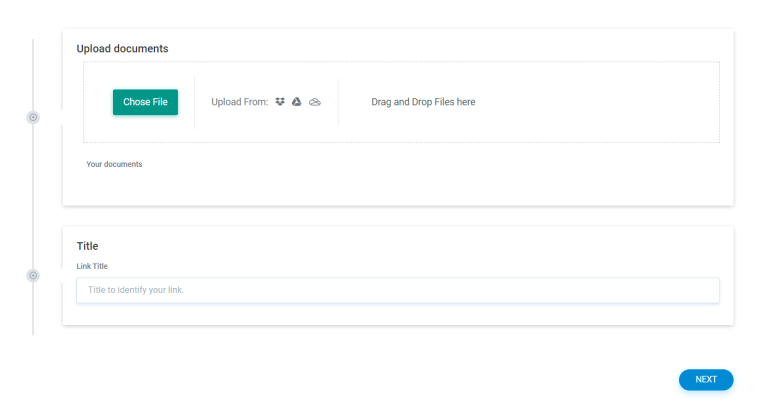
Click Add another recipient to add a new recipient
Add title
Add email message(optional)
Drag and Drop the fields
Click Send
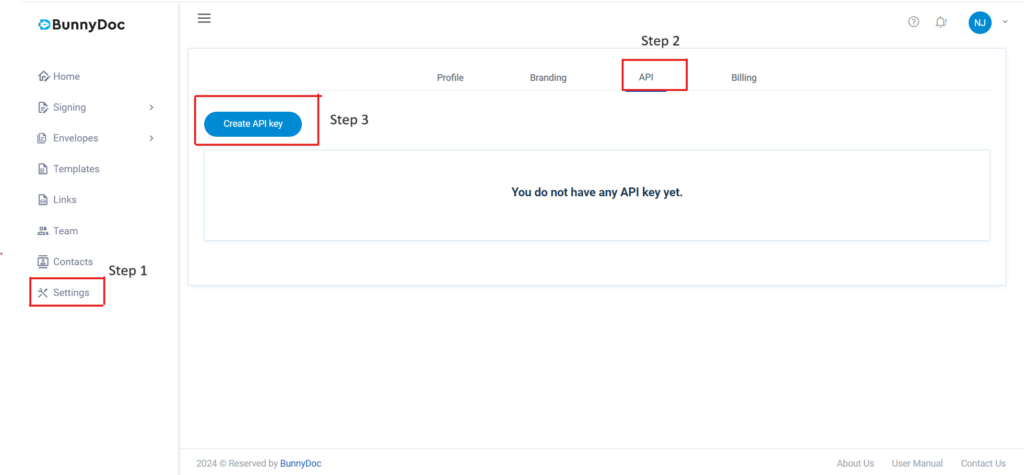
How to create an API key
Please follow the below steps to create an API Key
1: Sign in to BunnyDoc as an admin or primary account holder
2: Click on “Settings”
3: Navigate to the “API” tab
4: Click on button labeled “Create API Key”
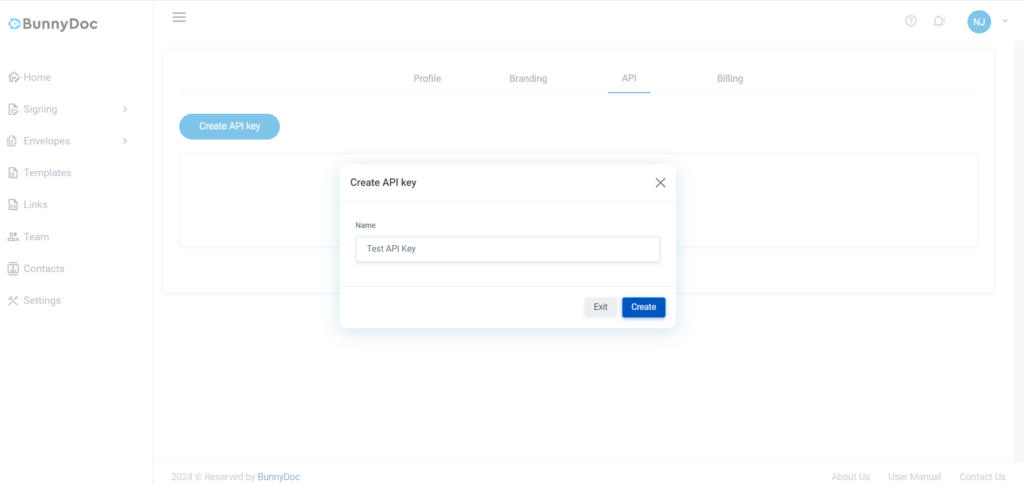
5: Enter name for API key whatever you prefer
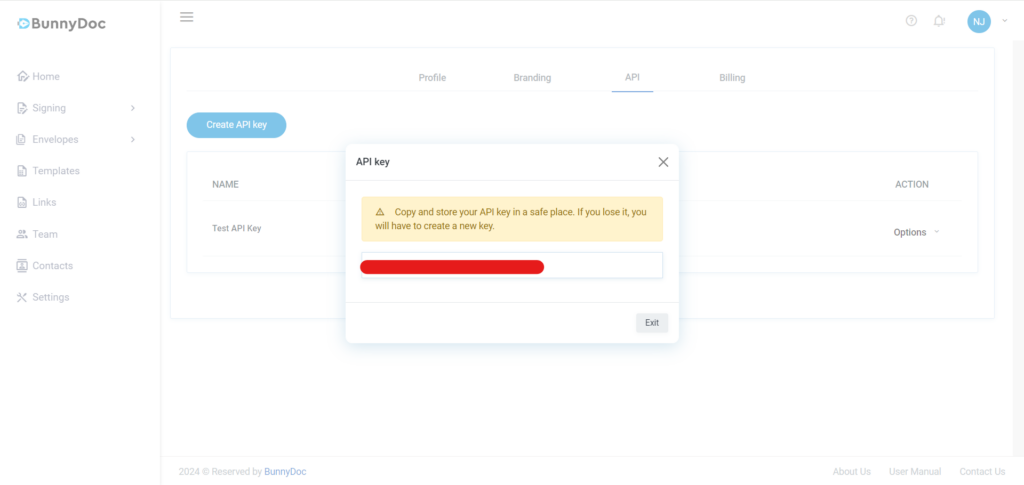
6: Copy and save the API Key in a safe place as it will not appear again
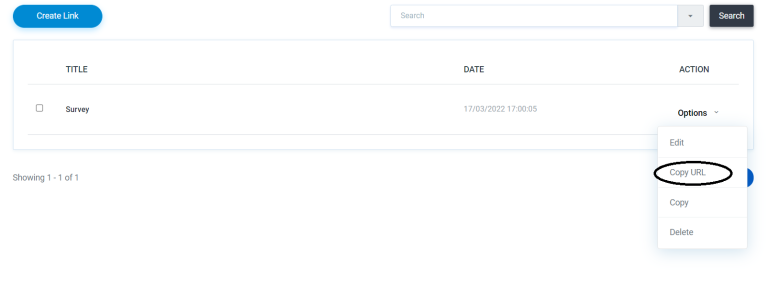
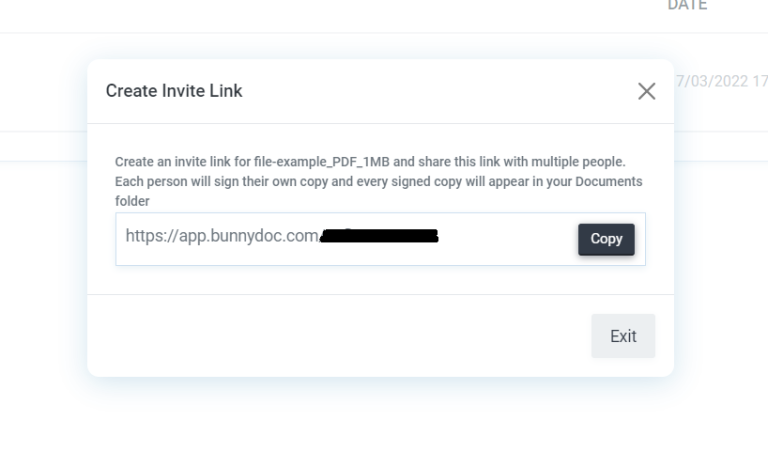
How to create a form link?
What is the public form link?
The public form link streamlines the signature request process by allowing you to set up your contract once and then obtain a public link to share with your users/visitors through your website or any other preferred medium. This eliminates the need to manually send them the signature request, making the process much smoother and more efficient for you.
How it works?
When users click on the provided public form link, they will be directed to a personalized page where they can input their name and email address. Upon submission, a signature request will be sent to the provided email address. Users can then follow the instructions in the email to complete the signing process. This method ensures that the email provided is associated with the individual initiating the signature request.
If the API key is correct and the request is successful, it will return a response containing an array with all team members’ information. Each element in the array will represent a team member and would include details such as their name, email, role, and any other relevant information associated with team members in the system.
Branding in BunnyDoc allows you to personalize the platform’s appearance with your company name, tagline, email signature, redirect link, and logo. This customization creates a professional and unique look for your e-signature processes, enhancing brand recognition, professionalism, and customer engagement.
To utilize branding in BunnyDoc, simply access the platform’s settings and customize your company details and upload your logo. By doing so, you can create a seamless and branded e-signature experience for your clients and partners. Experience the power of branding with BunnyDoc and elevate your e-signature processes with your unique brand identity.
Please use the API key for authentication. If you do not have one, then log in as an admin and navigate to account settings to create one. You need to add this API key as a header to each call/request. If it is missing, you will get an error message.
Remember that this key is an identifier of your account, so please keep it safe and do not share it with anyone except your organization.
Use the below header for all requests
Authorization: Api-Key {API_KEY}
Create signature request
This endpoint allows you to create signature request(s) from your saved templates
{
    "error": 0,
    "message": "Envelope has been sent to recipients.",

    "envelopeId" : "xxxxxxxx-xxxx-xxxx-xxxx-xxxxxxxxxxxx",
    "recipients": [
        {
            "name": "Signer1",
            "email": "[email protected]",
            "signatureRequestLink": "Signing URL"
        },
        {
            "name": "Signer12",
            "email": "[email protected]",
            "signatureRequestLink": "Signing URL"
        }
    ]
}
Webhook
Subscribe
This endpoint allows you to subscribe to webhook events.
POST
https://api.bunnydoc.com/v1/subscribeWebhook
BunnyDoc will initiate a POST request to the hookUrl you provide, anticipating the ‘BUNNYDOC API EVENT RECEIVED‘ string in response for verification purposes. Failure to receive this response will result in verification failure, and the webhook URL will not be registered to send event updates.
If the API key is correct and the request is successful, it will return a response containing an array with all team members’ information. Each element in the array will represent a team member and would include details such as their name, email, role, and any other relevant information associated with team members in the system.
If the API key is correct and the request is successful, it will return a response containing an array with all team members’ information. Each element in the array will represent a team member and would include details such as their name, email, role, and any other relevant information associated with team members in the system.
{
    "error": 0,
    "message": "We have sent an activation link to [email protected]. Please advise the team member to check the email for email verification. ",
    "firstName": "Joe",
    "surname": "Test",
    "email": "[email protected]",
    "role": "team-member",
    "status": "pending",
    "id": "sfdgsuf837r5345"
}
Create signature request
This endpoint allows you to create signature request(s) from your saved templates
Click on ‘All Envelopes’ under the Envelope from the left sidebar.
Click on the ‘Create Folder’ button from the drop down menu.
4. Give a name to the folder and then click on the ‘Create’ button.
5. Click on ‘Options’.
6. Select ‘Share with team’ from the drop down menu.
7. Select the team member(s).
8. Click on ‘Update’ button.
9. Go to the Envelope and click ‘Options’.
10. Click on ‘Move to the Folder’ from the drop down menu.
11. Select the folder and click on ‘Move’ button.
Please initiate the process again by clicking the link you recieved in your email.
In case you do not click "Finish" within the allowed time, this error will occur. Follow these steps to resolve it:
1. Go back to your email inbox.
2. Locate the email containing the signature request.
3. Open the email and click on the “Review & Sign” link provided.
This action will reopen the document, allowing you to resume the signing process.
4. Follow the instructions to review the document.
5. Sign the document as required.
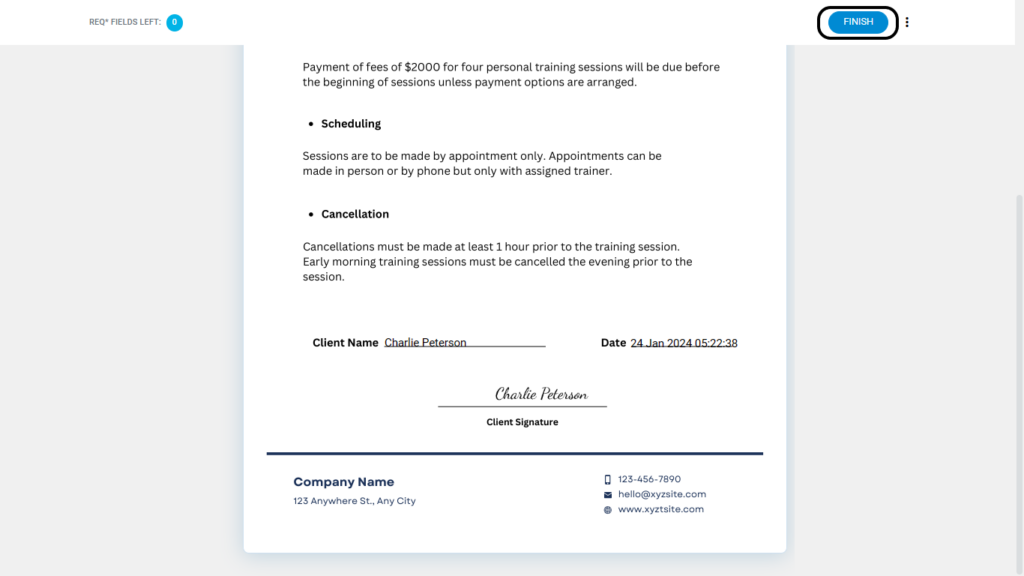
6. Click the “Finish” button to complete the process.
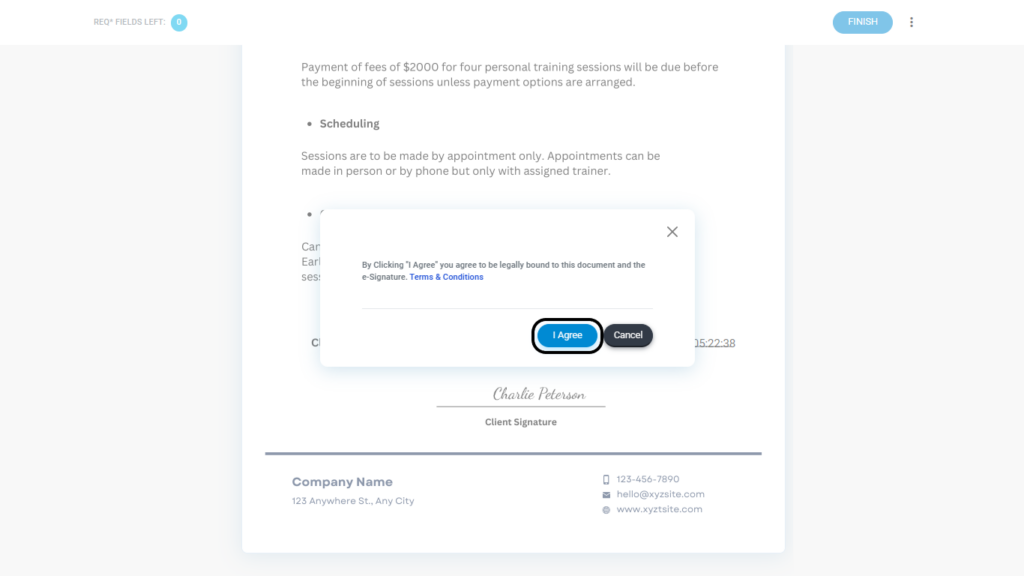
7. Click on “I Agree” to acknowledge that these signatures are legally bound to this document and the e-Signature Terms & Conditions.
The document has been successfully signed and sent back to the sender. You may also download a copy of this document for your records.
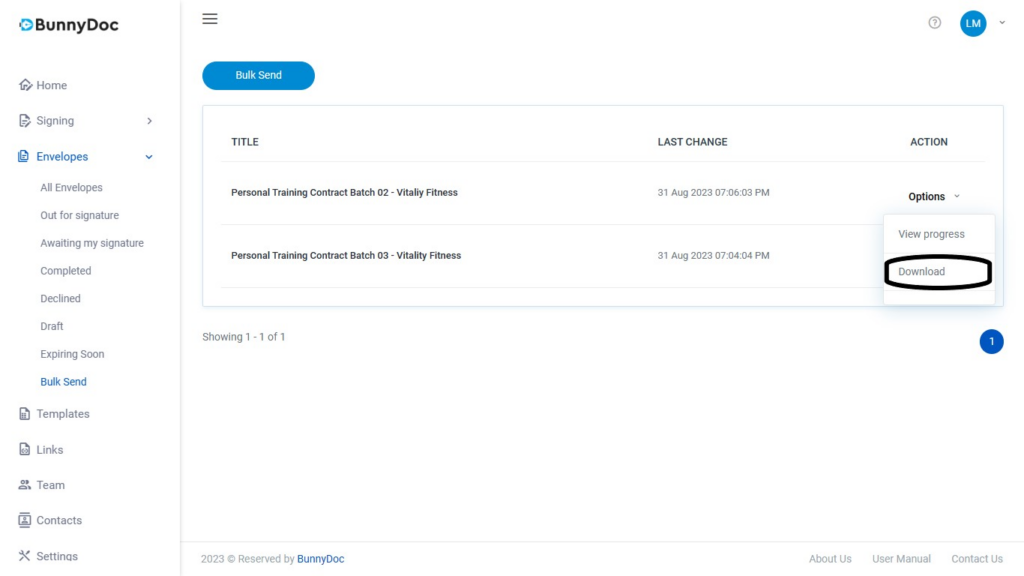
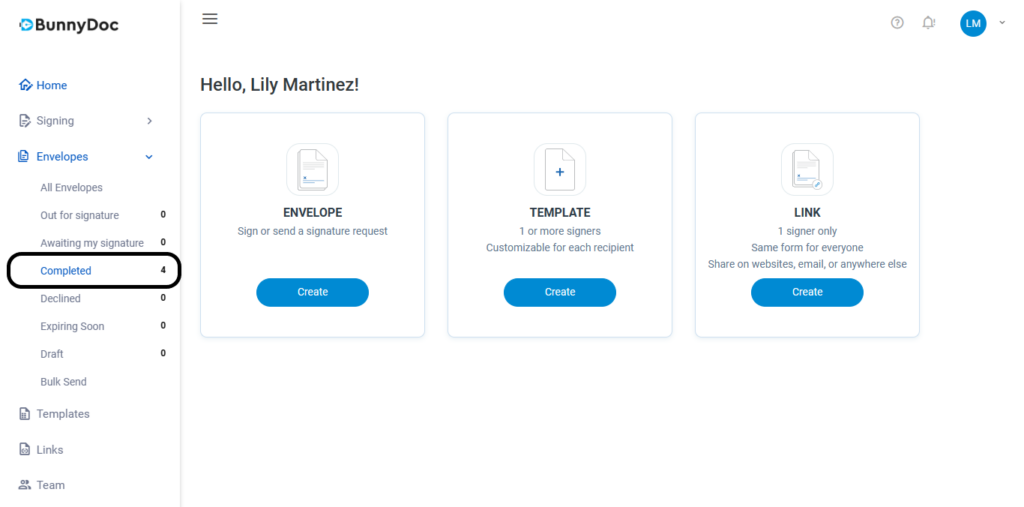
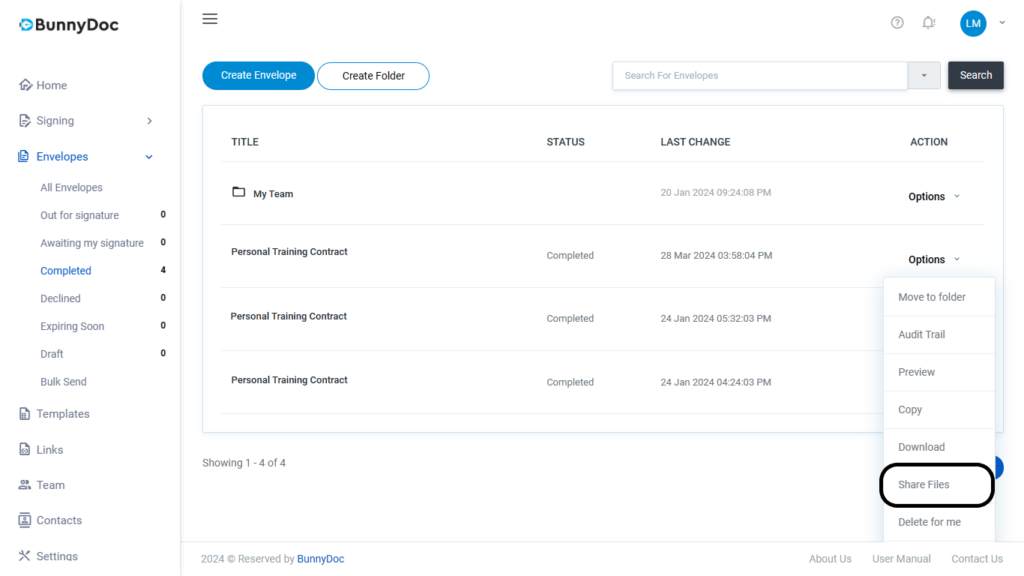
How to Share a Completed Envelope with New Viewers?
Go to the envelopes from the leftbar.
Click on Options next to the completed envelope.
Click on “Share Files”.
Enter the recipient’s email and click the “Share Envelope Files” button.
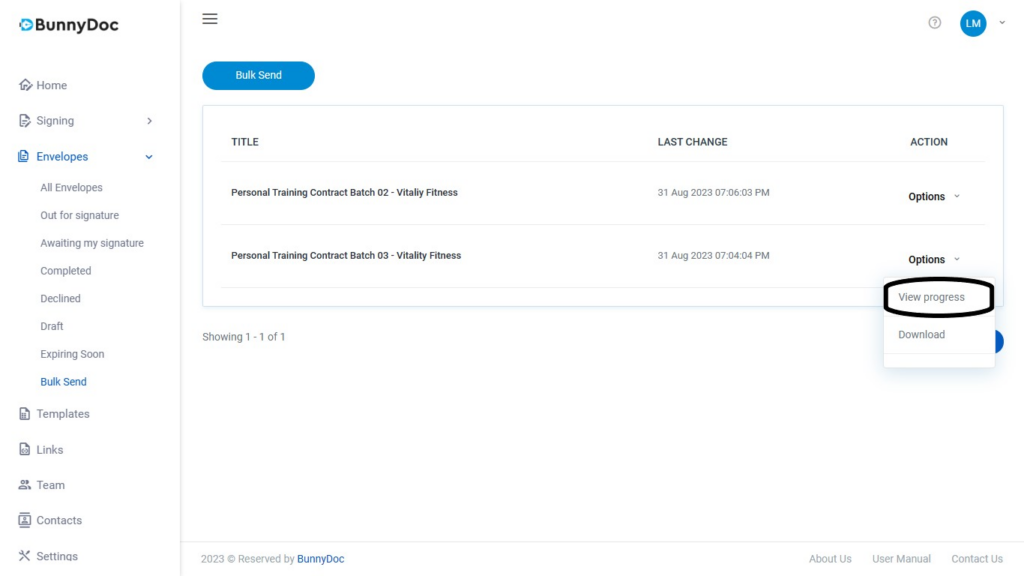
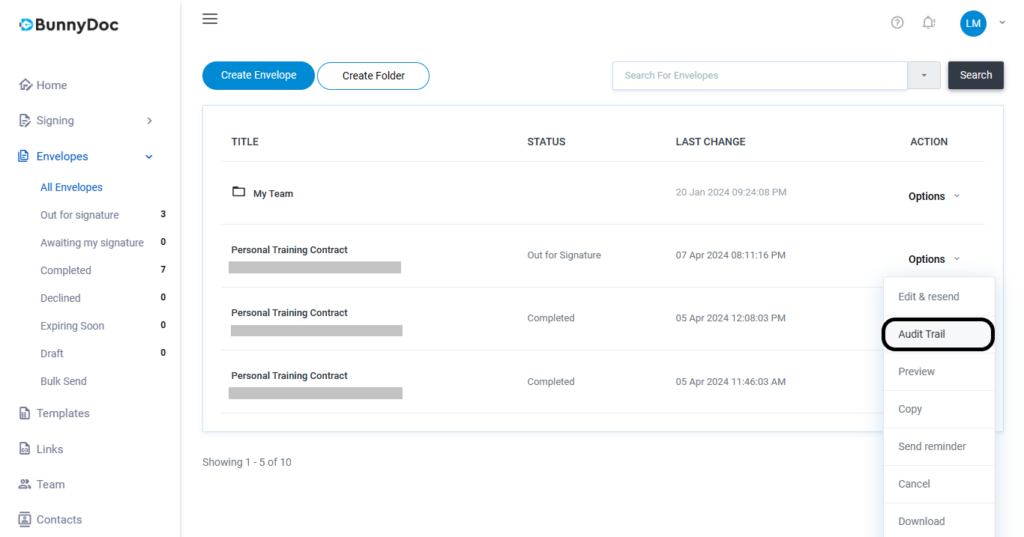
How to do an in person signing?
1: Go to the envelopes from the left sidebar.
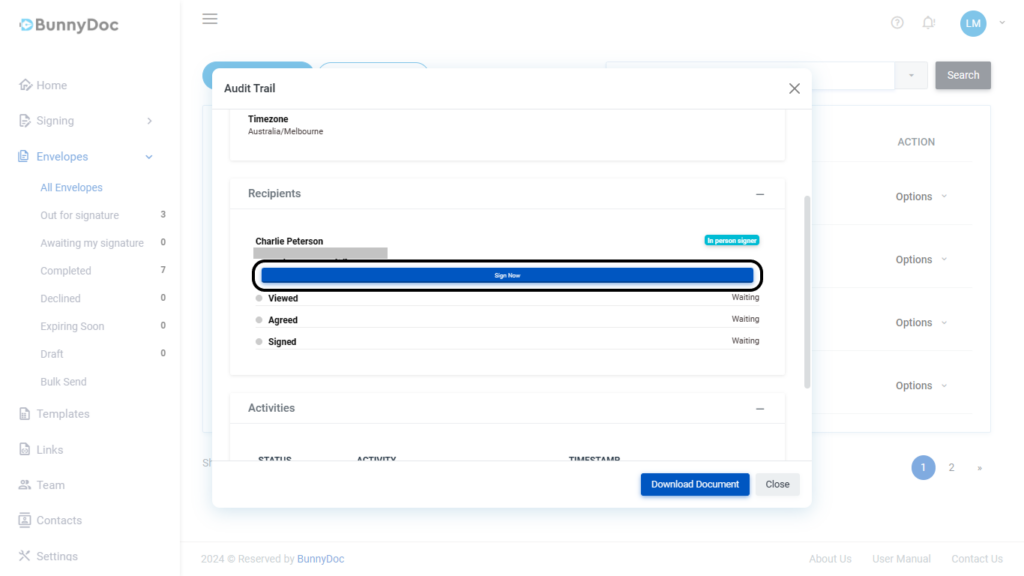
2: Click on ‘Options’ next to the envelope, then select ‘Audit Trail’ from the drop-down menu.
3: In the Audit Trail, navigate to the recipients section and click on the “Sign Now” button.
4: Now the signer page will open.
5: Continue to sign the document.
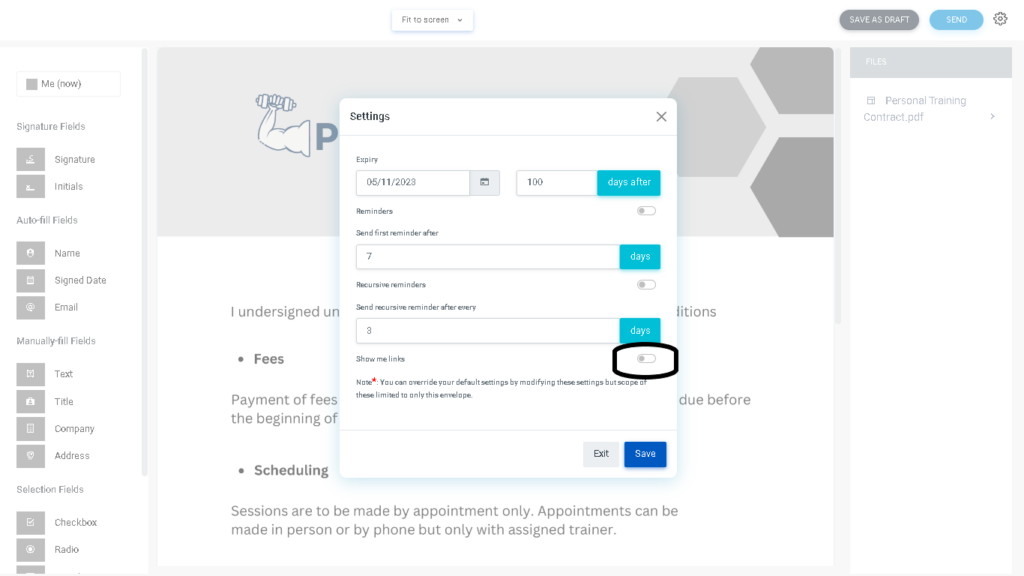
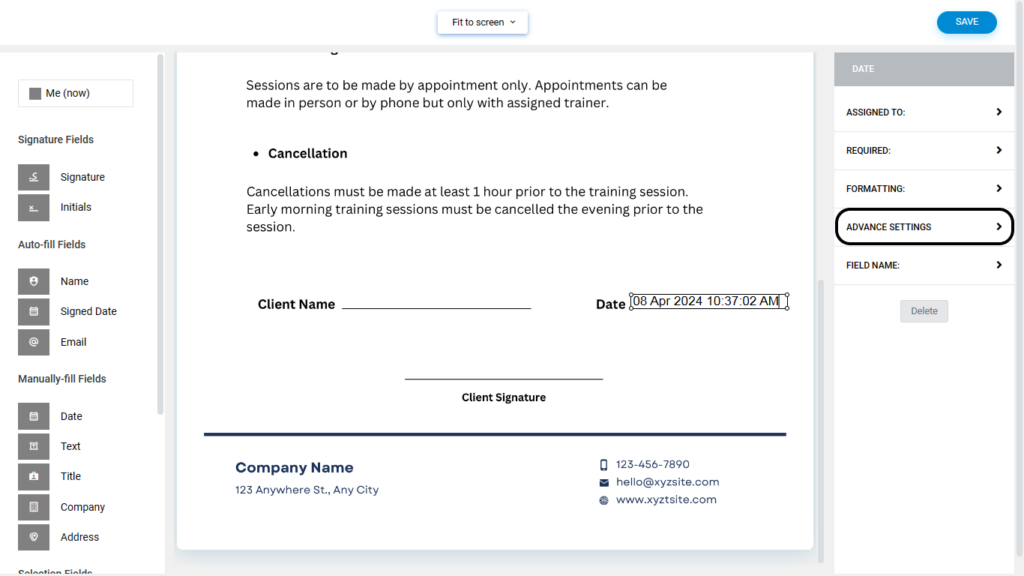
How to make the Date Field Dynamic?
Go to the templates and create or edit a template.
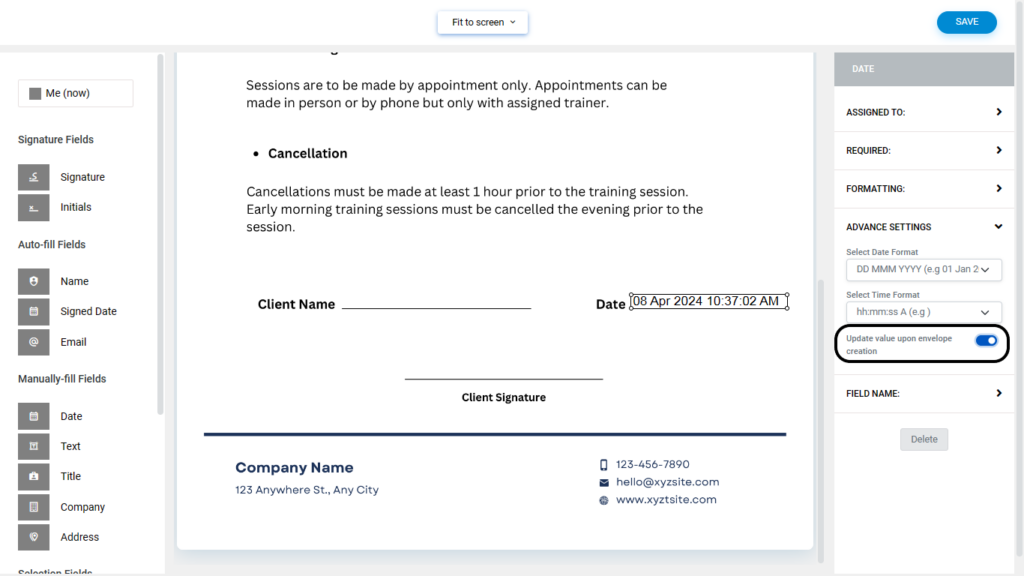
In the editor page, drag and drop the Date field, then click on ‘Advanced Settings’ from the right sidebar.
3. Now enable the “Update value upon envelope creation”.
4. Click on “Save” button to save the changes.
Note: If you have added a date for “Me(Now)” role, it will remain as it was; otherwise, it will be updated if you enable the 'Update Value Upon Envelope Creation' option. And if the date is for the signer, such as the signed date, it will be updated automatically when the signer signs the document.
How to make Fields Required?
In the editor, Drag and drop the required field.
Click on the “Required” from the right sidebar.
3. Now enable the Required Field.
Note: Keep in mind that Signature fields are required by default, and fields such as Name, Signed Date, and Email will auto-populate. Therefore, there's no need to mark these fields as required.
A template refers to a predefined document or form that is designed to be filled out and signed electronically. It serves as a framework or blueprint for creating consistent and standardized documents that require signatures. Templates are commonly used in various industries for documents such as contracts, agreements, and consent forms.
By using templates, businesses can save time and effort by eliminating the need to recreate documents from scratch for each instance. Templates can be easily customized, updated, and reused for multiple transactions or agreements. This streamlined approach helps maintain consistency, improves efficiency, and ensures compliance with legal and regulatory requirements.
4. Give a name to the folder and then click on the ‘Create’ button.
5. Click on ‘Options’
6. Select ‘Share with team’ from drop down menu.
7. Select the team member(s).
8. Click on ‘Update’
9. Go to the Template and click ‘Options’
10. Click on ‘Move to Folder’ from the drop down menu.
11. Select the folder and click on ‘Move’.
Note:The admin and the owner of this folder will always have access to this folder. Additionally, you can grant access to other team members for this folder.
The public form link streamlines the signature request process by allowing you to set up your contract once and then obtain a public link to share with your users/visitors through your website or any other preferred medium. This eliminates the need to manually send them the signature request, making the process much smoother and more efficient for you.
How it works?
When users click on the provided public form link, they will be directed to a personalized page where they can input their name and email address. Upon submission, a signature request will be sent to the provided email address. Users can then follow the instructions in the email to complete the signing process. This method ensures that the email provided is associated with the individual initiating the signature request.
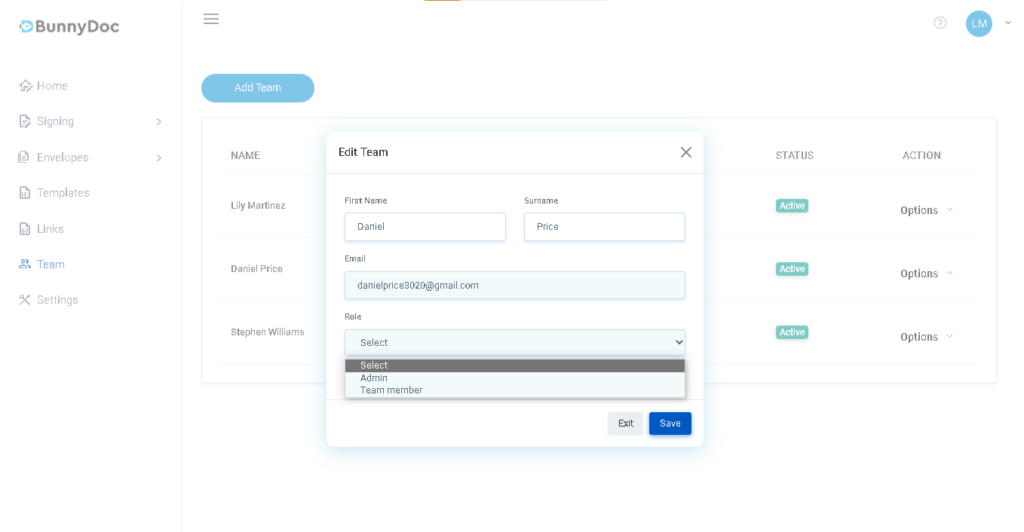
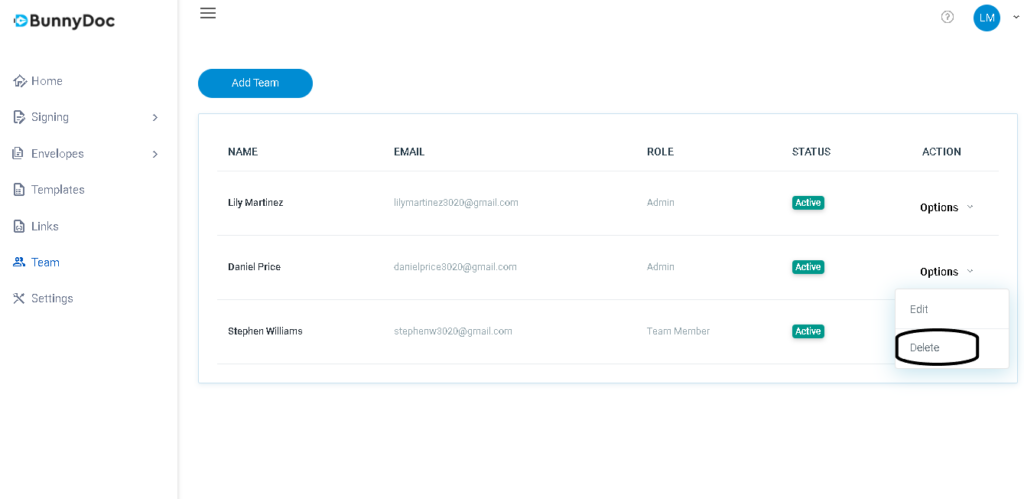
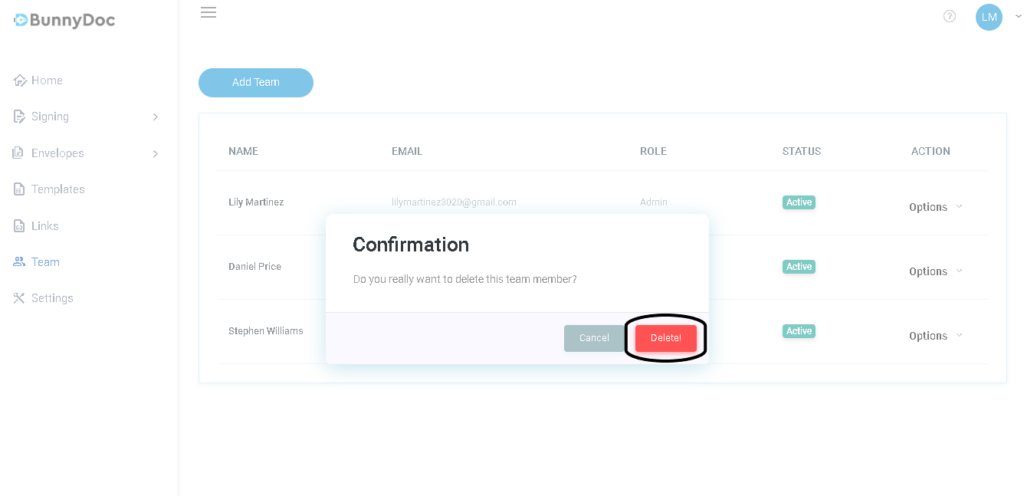
In BunnyDoc, a team is a collaborative group working together towards a common goal. Teams in BunnyDoc enable seamless collaboration, document sharing, workflow management, enhanced communication, and streamlined administration.
With teams, you can invite members, assign roles, and collaborate on documents in real time. You can easily share documents within the team, define workflows, communicate within the platform, and efficiently manage team activities.
Experience the power of teams in BunnyDoc to revolutionize your document collaboration and signing processes today.
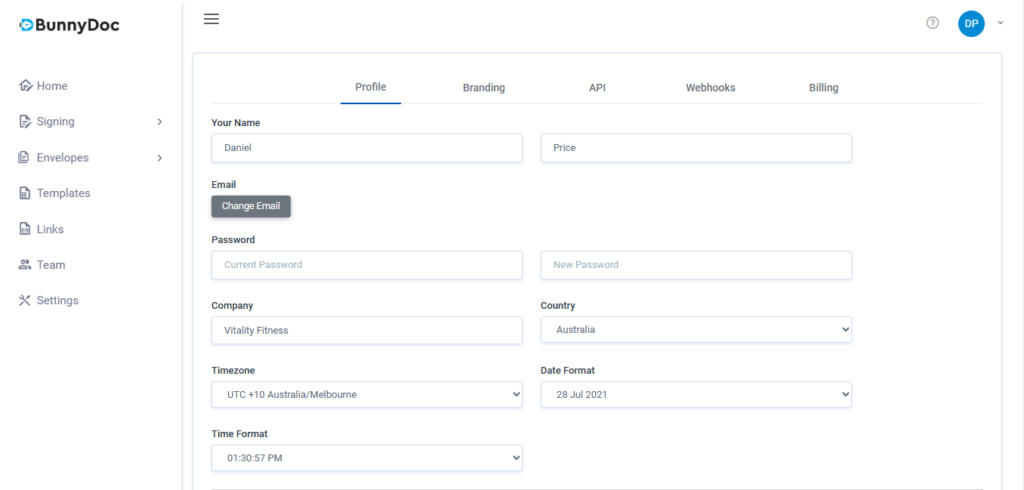
4. Update the Date Format and Time Format settings
5. Click Save
API
How to create an API key
Please follow the below steps to create an API Key
1: Sign in to BunnyDoc as an admin or primary account holder
2: Click on “Settings”
3: Navigate to the “API” tab
4: Click on button labeled “Create API Key”
5: Enter name for API key whatever you prefer
6: Copy and save the API Key in a safe place as it will not appear again
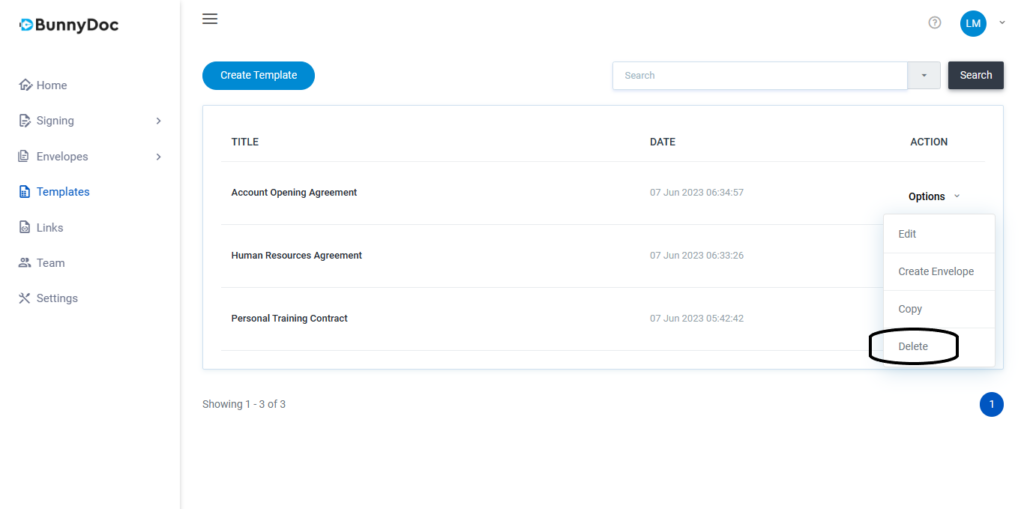
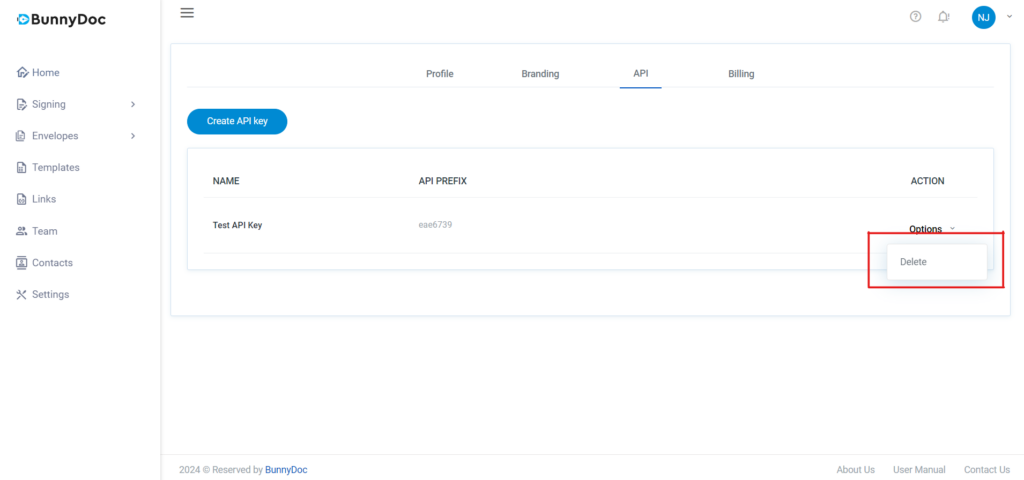
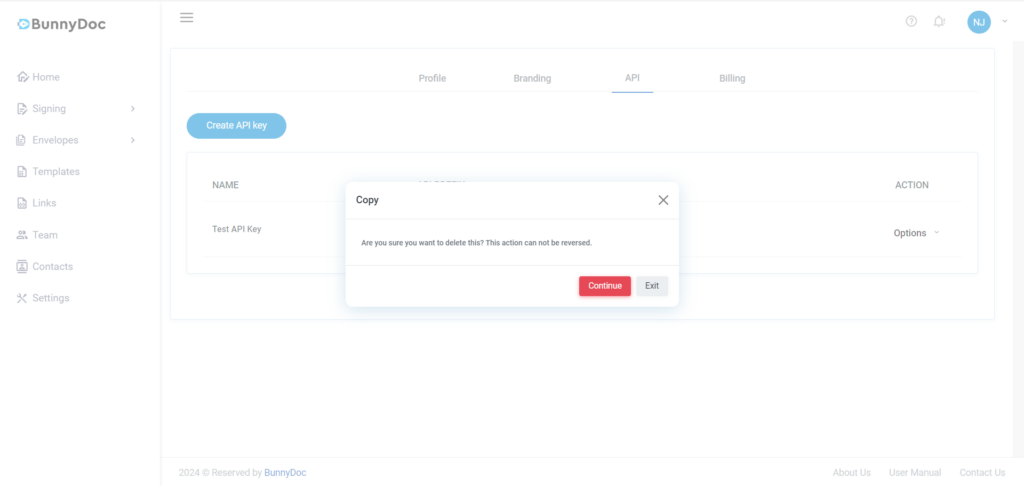
How to delete an API key
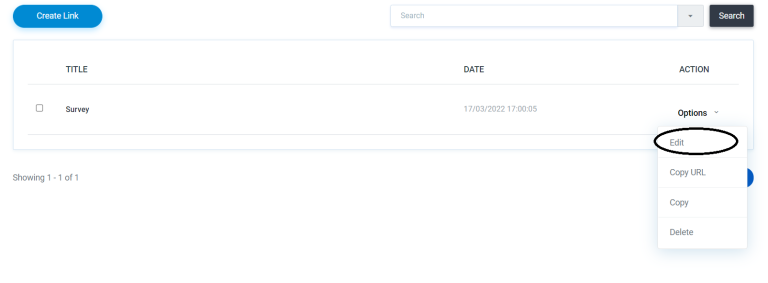
1: Click on the “Options” next to the API key. 2: Select the “Delete” option.
3: After selecting the “Delete” option, click on “Continue” to proceed with deleting the key.
Brandings
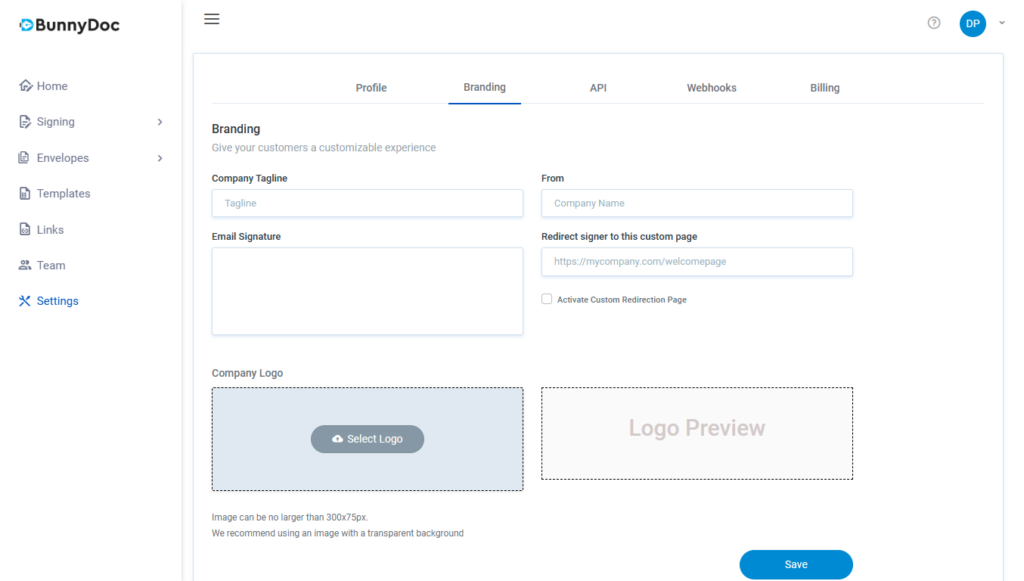
What is branding?
Branding in BunnyDoc allows you to personalize the platform’s appearance with your company name, tagline, email signature, redirect link, and logo. This customization creates a professional and unique look for your e-signature processes, enhancing brand recognition, professionalism, and customer engagement.
To utilize branding in BunnyDoc, simply access the platform’s settings and customize your company details and upload your logo. By doing so, you can create a seamless and branded e-signature experience for your clients and partners. Experience the power of branding with BunnyDoc and elevate your e-signature processes with your unique brand identity.
Enter your brand details in the corresponding fields.
Click Save.
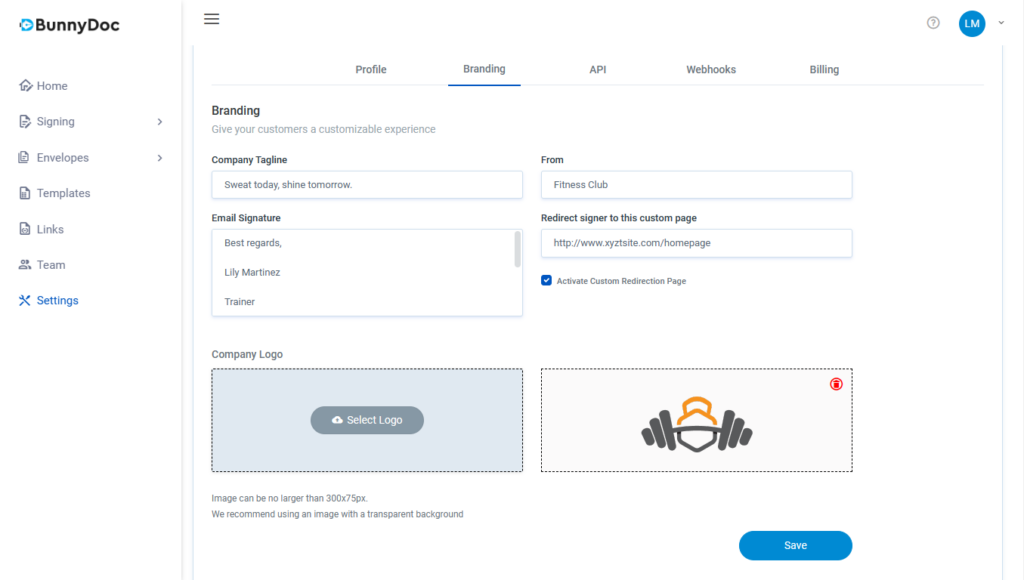
How branding works?
Branding works by personalizing the appearance of BunnyDoc, our e-signature solution, with your company name, tagline, email signature, redirect link, and logo. This customization creates a distinct and professional look for your e-signature processes, reinforcing brand recognition, professionalism, and customer engagement.
Simply access BunnyDoc’s settings to customize your company details and upload your logo. By doing so, you can seamlessly integrate your brand identity into the e-signature experience, ensuring a consistent and memorable impression on clients and partners.
Discover the power of branding with BunnyDoc and elevate your e-signature processes with a personalized touch that sets your brand apart.
If the API key is correct and the request is successful, it will return a response containing an array with all team members’ information. Each element in the array will represent a team member and would include details such as their name, email, role, and any other relevant information associated with team members in the system.
{
    "error": 0,
    "message": "We have sent an activation link to [email protected]. Please advise the team member to check the email for email verification. ",
    "firstName": "Joe",
    "surname": "Test",
    "email": "[email protected]",
    "role": "team-member",
    "status": "pending",
    "id": "sfdgsuf837r5345"
}
Enter your brand details in the corresponding fields.
Click Save.
Webhook
Subscribe
This endpoint allows you to subscribe to webhook events.
POST
https://api.bunnydoc.com/v1/subscribeWebhook
BunnyDoc will initiate a POST request to the hookUrl you provide, anticipating the ‘BUNNYDOC API EVENT RECEIVED‘ string in response for verification purposes. Failure to receive this response will result in verification failure, and the webhook URL will not be registered to send event updates.
The public form link streamlines the signature request process by allowing you to set up your contract once and then obtain a public link to share with your users/visitors through your website or any other preferred medium. This eliminates the need to manually send them the signature request, making the process much smoother and more efficient for you.
How it works?
When users click on the provided public form link, they will be directed to a personalized page where they can input their name and email address. Upon submission, a signature request will be sent to the provided email address. Users can then follow the instructions in the email to complete the signing process. This method ensures that the email provided is associated with the individual initiating the signature request.
Branding works by personalizing the appearance of BunnyDoc, our e-signature solution, with your company name, tagline, email signature, redirect link, and logo. This customization creates a distinct and professional look for your e-signature processes, reinforcing brand recognition, professionalism, and customer engagement.
Simply access BunnyDoc’s settings to customize your company details and upload your logo. By doing so, you can seamlessly integrate your brand identity into the e-signature experience, ensuring a consistent and memorable impression on clients and partners.
Discover the power of branding with BunnyDoc and elevate your e-signature processes with a personalized touch that sets your brand apart.
In BunnyDoc, a team is a collaborative group working together towards a common goal. Teams in BunnyDoc enable seamless collaboration, document sharing, workflow management, enhanced communication, and streamlined administration.
With teams, you can invite members, assign roles, and collaborate on documents in real time. You can easily share documents within the team, define workflows, communicate within the platform, and efficiently manage team activities.
Experience the power of teams in BunnyDoc to revolutionize your document collaboration and signing processes today.
If the API key is correct and the request is successful, it will return a response containing an array with all team members’ information. Each element in the array will represent a team member and would include details such as their name, email, role, and any other relevant information associated with team members in the system.
If the API key is correct and the request is successful, it will return a response containing an array with all team members’ information. Each element in the array will represent a team member and would include details such as their name, email, role, and any other relevant information associated with team members in the system.
{
    "error": 0,
    "message": "We have sent an activation link to [email protected]. Please advise the team member to check the email for email verification. ",
    "firstName": "Joe",
    "surname": "Test",
    "email": "[email protected]",
    "role": "team-member",
    "status": "pending",
    "id": "sfdgsuf837r5345"
}
In BunnyDoc, a team is a collaborative group working together towards a common goal. Teams in BunnyDoc enable seamless collaboration, document sharing, workflow management, enhanced communication, and streamlined administration.
With teams, you can invite members, assign roles, and collaborate on documents in real time. You can easily share documents within the team, define workflows, communicate within the platform, and efficiently manage team activities.
Experience the power of teams in BunnyDoc to revolutionize your document collaboration and signing processes today.
How to Sign a Document?
If you are the only signer, then follow the below steps.
Create an envelope.
Upload the files.
Mark the check box (I am the only signer)
If you want to sign the document and send it to someone else too. Then please follow the below steps.
Please make sure that ‘I am the only signer’ is unchecked.
4. Update the Date Format and Time Format settings
5. Click Save
What is a template?
A template refers to a predefined document or form that is designed to be filled out and signed electronically. It serves as a framework or blueprint for creating consistent and standardized documents that require signatures. Templates are commonly used in various industries for documents such as contracts, agreements, and consent forms.
By using templates, businesses can save time and effort by eliminating the need to recreate documents from scratch for each instance. Templates can be easily customized, updated, and reused for multiple transactions or agreements. This streamlined approach helps maintain consistency, improves efficiency, and ensures compliance with legal and regulatory requirements.
Branding in BunnyDoc allows you to personalize the platform’s appearance with your company name, tagline, email signature, redirect link, and logo. This customization creates a professional and unique look for your e-signature processes, enhancing brand recognition, professionalism, and customer engagement.
To utilize branding in BunnyDoc, simply access the platform’s settings and customize your company details and upload your logo. By doing so, you can create a seamless and branded e-signature experience for your clients and partners. Experience the power of branding with BunnyDoc and elevate your e-signature processes with your unique brand identity.
Enter your brand details in the corresponding fields.
Click Save.
How branding works?
Branding works by personalizing the appearance of BunnyDoc, our e-signature solution, with your company name, tagline, email signature, redirect link, and logo. This customization creates a distinct and professional look for your e-signature processes, reinforcing brand recognition, professionalism, and customer engagement.
Simply access BunnyDoc’s settings to customize your company details and upload your logo. By doing so, you can seamlessly integrate your brand identity into the e-signature experience, ensuring a consistent and memorable impression on clients and partners.
Discover the power of branding with BunnyDoc and elevate your e-signature processes with a personalized touch that sets your brand apart.
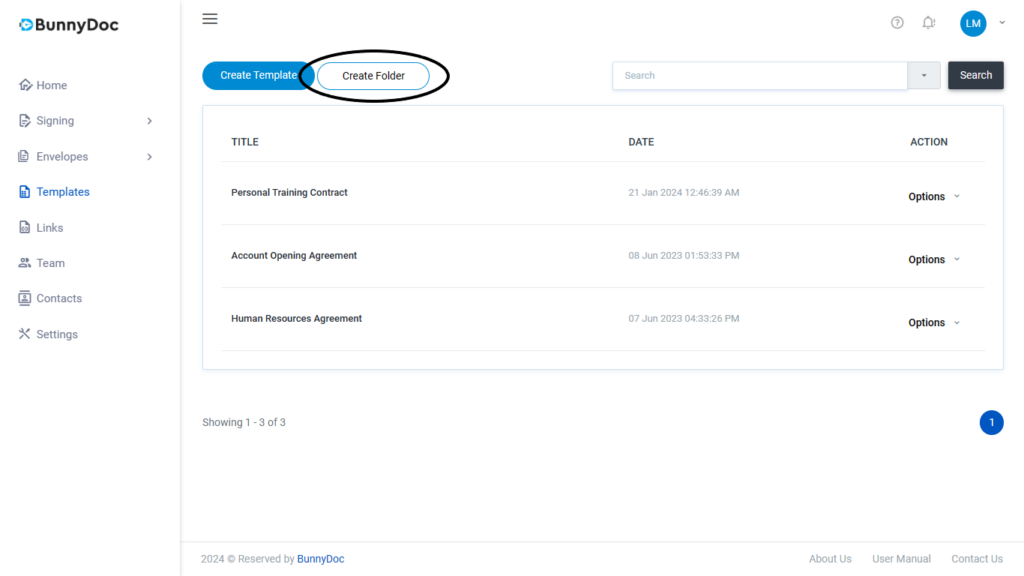
4. Give a name to the folder and then click on the ‘Create’ button.
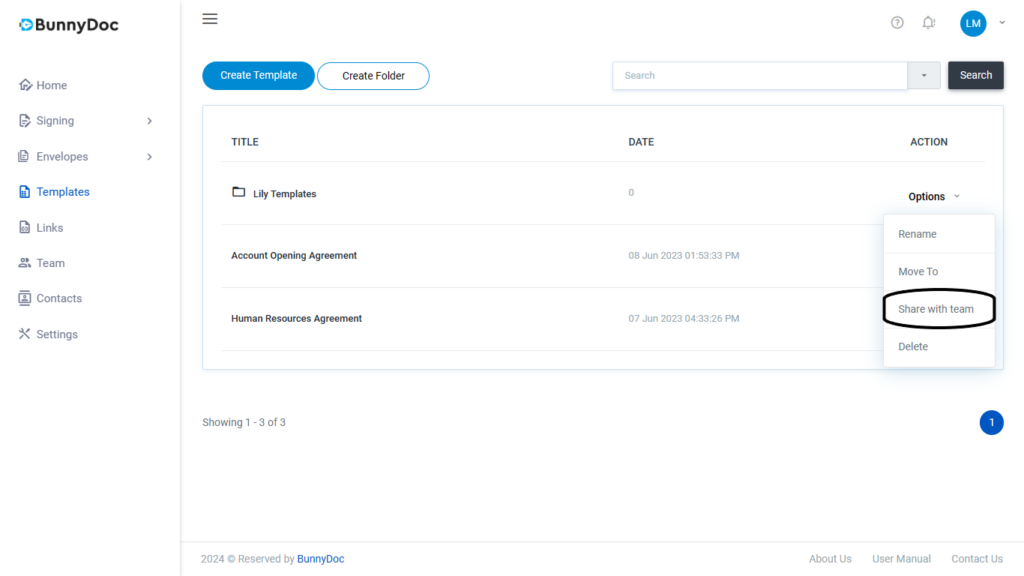
5. Click on ‘Options’
6. Select ‘Share with team’ from drop down menu.
7. Select the team member(s).
8. Click on ‘Update’
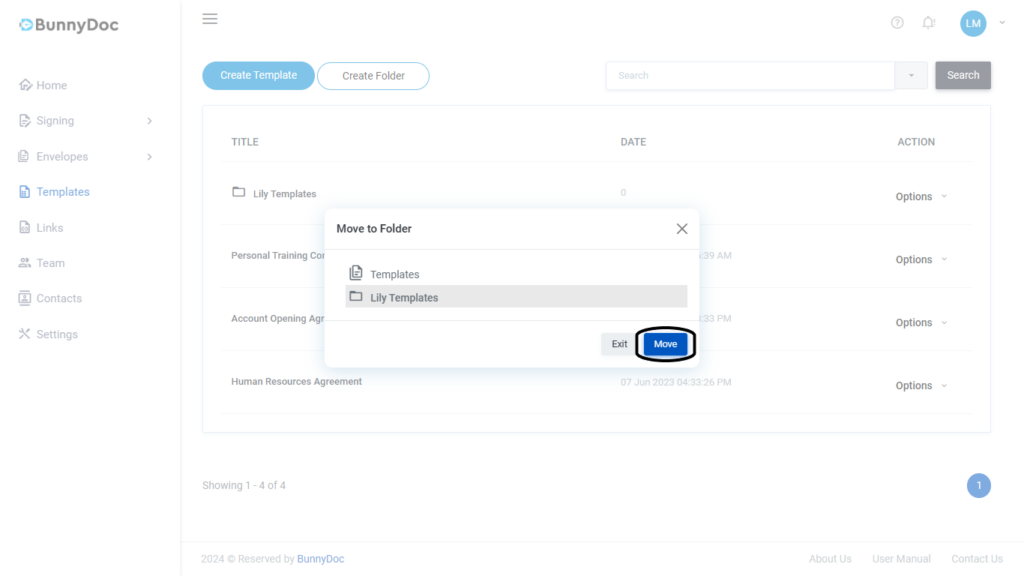
9. Go to the Template and click ‘Options’
10. Click on ‘Move to Folder’ from the drop down menu.
11. Select the folder and click on ‘Move’.
Note:The admin and the owner of this folder will always have access to this folder. Additionally, you can grant access to other team members for this folder.
Click on ‘All Envelopes’ under the Envelope from the left sidebar.
Click on the ‘Create Folder’ button from the drop down menu.
4. Give a name to the folder and then click on the ‘Create’ button.
5. Click on ‘Options’.
6. Select ‘Share with team’ from the drop down menu.
7. Select the team member(s).
8. Click on ‘Update’ button.
9. Go to the Envelope and click ‘Options’.
10. Click on ‘Move to the Folder’ from the drop down menu.
11. Select the folder and click on ‘Move’ button.
Please initiate the process again by clicking the link you recieved in your email.
In case you do not click "Finish" within the allowed time, this error will occur. Follow these steps to resolve it:
1. Go back to your email inbox.
2. Locate the email containing the signature request.
3. Open the email and click on the “Review & Sign” link provided.
This action will reopen the document, allowing you to resume the signing process.
4. Follow the instructions to review the document.
5. Sign the document as required.
6. Click the “Finish” button to complete the process.
7. Click on “I Agree” to acknowledge that these signatures are legally bound to this document and the e-Signature Terms & Conditions.
The document has been successfully signed and sent back to the sender. You may also download a copy of this document for your records.
How to Share a Completed Envelope with New Viewers?
Go to the envelopes from the leftbar.
Click on Options next to the completed envelope.
Click on “Share Files”.
Enter the recipient’s email and click the “Share Envelope Files” button.
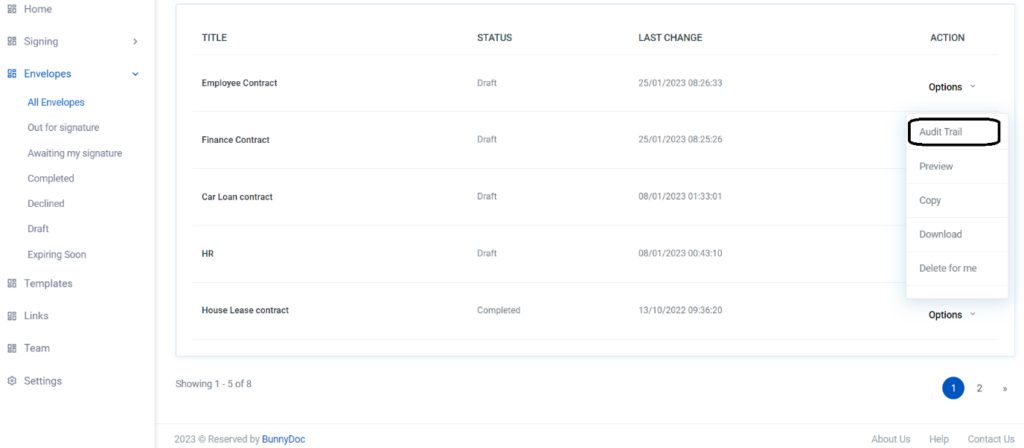
How to do an in person signing?
1: Go to the envelopes from the left sidebar.
2: Click on ‘Options’ next to the envelope, then select ‘Audit Trail’ from the drop-down menu.
3: In the Audit Trail, navigate to the recipients section and click on the “Sign Now” button.
4: Now the signer page will open.
5: Continue to sign the document.
How to make the Date Field Dynamic?
Go to the templates and create or edit a template.
In the editor page, drag and drop the Date field, then click on ‘Advanced Settings’ from the right sidebar.
3. Now enable the “Update value upon envelope creation”.
4. Click on “Save” button to save the changes.
Note: If you have added a date for “Me(Now)” role, it will remain as it was; otherwise, it will be updated if you enable the 'Update Value Upon Envelope Creation' option. And if the date is for the signer, such as the signed date, it will be updated automatically when the signer signs the document.
How to make Fields Required?
In the editor, Drag and drop the required field.
Click on the “Required” from the right sidebar.
3. Now enable the Required Field.
Note: Keep in mind that Signature fields are required by default, and fields such as Name, Signed Date, and Email will auto-populate. Therefore, there's no need to mark these fields as required.